Over this past year, we have been exploring with students creating their own Virtual Reality Applications along with Dr. Joyce Zhou from the School of Business. You can read more about that in the Educause Blog. Learning Technologies invested in a product called InstaVR almost a year ago. InstaVR provides a turnkey solution to creating VR applications with very little programming knowledge. You can see some examples on our website. Have you considered having your students make their on VR application for your course? We have the abilities to do that AND they can publish their applications to the Google Play Store and/or to Apple. We can help you build the project into your curriculum. Here is a quick tutorial for your students:
1.
Use the Samsung Gear 360 Camera.
2. Download the software for Samsung Gear 360
if you haven’t done so already. You can download from: https://www.samsung.com/us/mobile/virtual-reality/gear-360/gear-360-sm-r210nzwaxar/ - it’s a link at the top, small writing…easy
to miss.
3.
Next, you will need to download the App to your phone.
The app looks like the image on the right. Locate this app in the Play Store
for Android or on the App Store for iOS.
4.
Recording the video:
a.
If you plan on using InstaVR to develop hotspots,
hovers, links and rich content then I would suggest using a STILL IMAGE. You can change this
setting on the Samsung by pressing the menu key until you activate the Photo
setting.
b.
If you plan on demonstrating an event, illustrating how
something works or to give users the experience of a live event, then I suggest
using VIDEO. You will need to toggle to
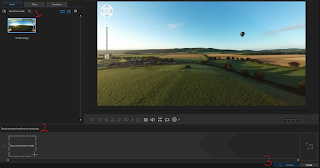
the Video setting the same way you did the still image setting. Once you record the video, upload the video the Samsung Gear 360 Action Director software you downloaded in step 2. From there, once your video is uploaded, drag it to your timeline (bottom of screen). Then click the PRODUCE button on the right hand corner.
6.
Begin a new project by selecting the drop down at the
top.
7.
Once you create your project, you will see the five
options at the left. The first option is AUTHORING. This is where you upload
your VR content. (The file you created previously with Samsung Active
Director).
8.
There are several options for creating hotspots, links
and actions.
a.
HOTSPOT – A hover, allows you to create a pop-up video
or image.
b.
LINKS – Will take the user to another VR file OR
external website.
c.
ACTIONS – Will make a phone call or email.
9.
The second tab is BRANDING. The branding options allow
you to upload your own icon and graphics for when users load the VR app.
10. Preview
allows you to preview the applications.
11. Package
the app for various VR mediums including Samsung, Oculus, Web.
12. Finally,
download your file to view.
It's very simple to create a Virtual Reality application with InstaVR; contact me and I'll help you build a rubric for an upcoming project!
~Anna


No comments:
Post a Comment